Monday, November 9, 2015

Painting the Flying Spirit of the Bird

When I last posted, I was following the feathers. They led me to the peacocks, and then, as always happens in the creative process,  I ended up somewhere I had not even imagined!

I was recently inspired to create some art for an exhibition hosted by the Orlando Museum of Art called "Animals!". It was funny that this exhibit came up, because I had put off creating my peacock painting in alcohol ink for a long time, the whole process seeming overwhelming. If you followed my last post, you'd see how I had struggled, but really wanted to move forward with this new medium, and well, how I was so enthralled by the peacocks.  The next logical step was just to DO IT, and the exhibit provided the perfect motivation.

Here's the photo from the last post of the incredible creature that I chose to render.


Unlike the earlier alcohol ink works that I had done, I decided that with this one, I'd use a couple of different little tricks to help me start. First, I used some watercolor to sketch in the image of the bird. This way, I could always pull it up with some water if I wanted to make changes before starting on the alcohol ink. Then I did something else new- I used some masking fluid to outline the bird, thus letting me be a little more free with creating the background. I was surprised at how much it looked like an angel!


The next step was dropping in some different greens, and brown, and blotting them with paper towel to get a first layer that was homogeneous. I knew I wanted the top level of the bird to have a different treatment, so I focused on creating sort of a horizon line. Then I just had some fun dropping in some other colors to create shading within the greens.


This next photo shows what happened when I also dropped some rubbing alcohol to mix everything up.


I went at the colors as they mixed with a little brushing with dry brushes, and some blotting with paper towel, to create this look.


At this point I decided that the background needed to have a little more definition of darkness under the wings, to help the bird stand out from the background. I played a little with that. Also in this picture you can see how I started to put in the upper part of the background. My thought was to make it appear more like "sky" while the bottom looked more like "earth", and the bird itself and the activity of its flight was the transition. The technique I used for the sky was to drip some colors on the left edge of the paper, and lift the paper to let it run to the other side. You can see how things started to get a little messy over the peacock's head, but I knew I was covering that with bold and dark colors, so that was ok. I played with the sky until I liked the look.


Here's how it looked when I removed the masking fluid. Still a lot of work to do.


This was the tough spot for me- to just get bold and start dripping color for the bird. However, Once I told myself to loosen up and do whatever needed to be done for the whole piece, including working more on the background, so be it. I started light to dark. I decided to use even more layering of color and drops of alcohol ink to make the "earth" part of the background interesting.


Next came a critical point in the piece for many reasons: I worked in the very dark feathers behind the orange ones, and started to do the detail of the "eyes" on the peacock feathers. I started to get really frustrated and went back and forth washing over and erasing things and redoing them several times. Once during that day I was reading and happened upon this quote by Robert Henri: "Paint the flying spirit of the bird rather than its feathers." Reading that gave me permission to really let my hand knew it was supposed to do all along.


Here is the piece as finished- I ended it with more work on the wings, tail, and doing some free splattering of fun. and I think he was finally flying!


I was so honored that this work, plus two others were selected for the show at the Museum, which turned out to be an amazing show, and so thankful that they were received wonderfully. Now, I'm inspired to create more!

Please comment if you have any questions!!!

Thursday, July 16, 2015

Playing with Peacocks, and Discovering Alcohol Ink

Well, I was going to wait a bit til I had more work done with a new exciting medium that I discovered, but I thought I'd take a break from what I'm doing to put it down in writing.

It all started last spring when I met a fellow artist at an event at the Orlando Museum of Art. I did not recognize her, but I did recognize her work, and as we conversed I discovered that she too was a lover of Yupo paper! As we discussed our techniques, I told her how I was unhappy with some watercolor brands, and asked her what she uses. I learned at that time that she uses alcohol ink! Apparently, though, a lot of people do. It is a permanent medium, unlike watercolor on the Yupo that could, conceivably, be washed away.

This is how it always seems to happen with me- I usually stumble upon something accidentally that the whole world seems to have known since the dawn of time, and I feel kind of silly.

Immediately, I thought of a subject that I had been wanting to capture. When I was visiting an aquarium last spring with my sister, I saw this incredible giant octopus. I stood there mezmerized for what could have been half an hour, and I know she wanted to move on, but I just couldn't stop studying it. So I took a video to capture it a bit.


Well, I figured what an APPROPRIATE subject to test out alcohol ink on, an octopus!! The Orlando International Fringe Festival was coming up, where I have shown my art for several years, and I took that as a goal for finishing the piece to submit for the show. It would be a perfect venue, I figured, since the spirit of Fringe is to move beyond your comfort zone as an artist and discover something new.

I really had no idea what to do. All I knew was that the inks worked similar to the watercolors, except that instead of being soluble with water, I would have to use alcohol, and/or a mixative. I went to my favorite store near me, Art Systems, to see if they had the materials, and I figured it was meant to be because they only had 5 colors, which happened to be the exact ones I would need to complete the work. I did have to pick up a black from another store, but I had most of what I would need. I picked up a spare set of watercolor brushes, and went to work on a new pad of 9 x 12 yupo.

I had looked on the internet a bit, but honestly there was very little to teach me how to do what I wanted, so it was going to have to be complete experimentation. I honestly had no idea if it would work or not.

The first thing I did was to pour out some of the inks in separate wells of a palette, and literally brushed them on the yupo. I discovered pretty quickly how different the alcohol ink was than watercolor (at least as far as using the same brush-on techniques I was used to) because:

1) It dried REALLY fast, even the inks I was using in the wells of the palette, so I had to work very quickly. Once the ink was squeezed out of the little tube, I had only a few minutes to sop it up and lay it down onto the painting.

2) Unlike the watercolor, there really was not a complete "erase" ability. In other words, if you made a mistake and tried to pull up the ink with alcohol, there would still be some pigment left on the paper, it wouldn't be completely white. But:

3) It did allow for layering since it did dry fast.

4) The bad part too was that it was really messy - as in permanent messy- and everything smelled like a doctor's office.

So since I didn't have a lot of time to worry, I just brushed out an abstract version of my octopus that looked like this:


From there, I just played around with squeezing out more pigment, and the only detail I really concerned myself with was the eye. The main reason I thought that alcohol ink would be fun for the octopus was dropping pigment and alcohol for all of the little suction cups, and I was right. 

However, I did learn early on that there was not a lot of control. The size of your "drop" depended on the size of the dropper obviously, and just a little tiny dropper size really bled big. 

I thought about getting anal about it and upset, and figuring out how to fix it, and then I decided to just...have....fun.... 

So in the end the piece turned out looking like this: 


And I liked it. Keep in mind that this photo really doesn't explain it well. There was a lot of glare as I took the shot.  A better one, though with less detail shows it as it hung at the Fringe Festival a couple of weeks later: 

I titled it "Dancer in the Deep", because it stuck with me that the lady at the aquarium described the octopus we were viewing as having a real personality, and she said she was happy that she was "dancing" for us.

And the cool thing is- the art was claimed before the gallery even really officially opened, and I was told that it went to the Fringe Festival's President of the Board of Directors. I was COMPLETELY HONORED and overjoyed. 

Well, this new medium, with its bold colors and dreamy effects had really taken ahold of me in terms of its possibilities. 

After Fringe, I was floating a bit creatively, and frankly really just busy with the children's book promotions and marketing, as well as beginning some new books. I did not know where I would be heading fine-art wise.

Then I decided to again, follow the feathers.

Before Fringe, I had gone to an event at the Polasek Gallery and Sculpture Gardens where they had brought in some birds of prey to view, they had a bird exhibit, and an exhibit about the peacock as the Winter Park Logo and its history. While speaking with the curator and sharing my "feathers" inspiration (as outlined in this blog previously), she mentioned a place in town where a man raises birds, and she encouraged me to get ahold of him- maybe he would sell me some feathers, and share some info with me that would be inspiring.

I was a bit hesitant to follow that path, as I really didn't know this fellow. But, I took a chance and decided to call him up, and he invited me to visit what he described as his "bird sanctuary". He raises peacocks, and the property was just beautiful, on a lake in downtown Orlando. It was a little sketchy, I'm not going to lie. However, in the end I was blessed with a lot of his spirit and love of nature shared to me. 

The first thing that happened when I got there was that there were a lot of peacock feathers hanging around. He gathered them up, gave one to me, and told me to look at it as I turned around in different angles from the sun. He said that it was impossible to paint it. I nodded my head, but inwardly I decided I'd try to prove him wrong.


He brought me on a tour of his property, including a beautiful lake on one end with some incredible lily pads. 


The flowers were incredible. I wish I could describe it to you, but it really is impossible. He plucked them from the lily pads and had me smell them. I smelled the purple one and can only describe it to you like heaven. And then I smelled the blue one, and again, I can only describe it as heaven, but it was completely different, and I can't explain how that is possible. He had a wonderful way of explaining that that scent was what Moses smelled as a baby floating down the Nile, that brought me to tears. He had, earlier, made honey from those flowers (he showed me where he had kept bees and made honey years ago). Later he put them in water and I got to bring them home!


He had some incredible peacocks outside, and I got a photo of one with his wings open that was breathtaking.


Also I got to have a whole lot of fun with a bunch of baby peacocks, and learned that they are not shy of people, or cameras. :)


Well, when I decided to pick up the alcohol ink again, I wanted to work on all of this, as it was just so beautiful. The flowers were the first thing I approached. I did look a bit more online, and saw a lot of people approaching work with this medium by dropping the color directly onto the paper, thereby sidestepping the problem of having it dry in the wells of the palette. I decided to try that this time. I'm going to post a video I took as I was working, but please keep in mind that I was (and am) still experimenting, and as I look at this now I realize how painfully slow I was still working.


 Also, as I will show you later working from light to dark was something I had not mastered yet, and there are some things that can be done with this. Here I did not use the palette at all. I had bought a couple of more colors, including a green that was more olive-toned. I dropped it down with a bit of the brighter green and in the end realized I had to use quite a bit of alcohol to lighten it.

The piece turned out kind of cool. It didn't look like the flowers I started with, but I don't mind because it's all in the game of learning, and the end work turned out pretty. I called them "Lotus Flowers" because of the biblical reference that was rendered by the bird breeder, and I love all of the spiritual folklore of the lotus flower. It was so neat to see the actual flowers close up at night and open during the next morning. 


The other thing I discovered was that really, working with 91% rubbing alcohol is really the only thing that works. the 70% doesn't cut it for lightening pigment once its down, and the higher concentration really cleans the brushes better.

The next piece I wanted to play with was a peacock feather- something colorful and easy to recognize, and I knew, like the octopus, I could play with it a lot and still have its spirit shine through.

Before starting the new piece I got some squeeze bottles with tiny nibs to use for very small amounts of pigments so that things wouldn't bleed too fast and get out of hand. I also had seen online about using some q-tips, so I got those to experiment too, and laid out everything knowing I would work just as fast as I could, having everything easily accessible. The right kind of alcohol, plenty of paper towels, etc. It was getting easier and I was learning how to be prepared.

After some more research I learned how to lay in some background, lightly, and then go for the layer above. The piece changed a lot as it went but I played just enough to make it look like I had captured the spirit of the feather.  I had so much fun thinking of the spirit of the incredible work of art that God made to hypnotize the lady bird as she looks into those blue eyes, maybe this is what she sees....


Next I am tackling that incredible peacock as he flies. I know that has the potential to be overwhelming but I plan to approach it in the same way as these, with no expectations except to let myself be free and "go with the flow" as it were...

And I like to think that maybe, sometimes, painting exactly what you see is not the goal. Maybe that's how I proved the peacock guy wrong- you CAN paint a peacock feather, if you don't LOOK too much, but FEEL it flying in your heart.

Monday, December 22, 2014

Mother of the Bride, Part 3- The Winter Wedding Comes Together

This wedding became real to me months before the actual occasion, but not in the way many do for the mother of the bride. I was not in charge of picking out everything or paying for everything, thank goodness. But, my daughter had entrusted me with a precious task, which was to design the flowers, and to design the layout of the wedding site in general. For me, once I put pen to paper to design and invest my creative energy, that's when it started to get real. The funny thing is that my daughter completely understands this, because she is also an artist. She is also brilliant, because she knew this would keep her emotional mom busy and therefore less likely to worry about everything!

I began the flower design by researching what kinds of flowers are available in winter. My daughter's wedding would be held at Autrey Mill Nature Preserve just north of Atlanta, Georgia, on Dec. 13th. There are historic buildings on site, including a  historic chapel built in the 1800's, where the ceremony would take place. For the flowers, she wanted mostly greens, and only white flowers.

Because of my earlier research on birth flowers, I already knew that her birth flower was the chrysanthemum, and that the flower had a lot of significance in Japan, which is where half of her heritage lies. So, the chrysanthemum was a natural pick for part of the arrangements. However, neither one of us liked the "Spider mums", and I didn't really care for the little button mums for a wedding- too common. My early research online led me to what was called "incurve mums". Later I found that this term was pretty broad, and I had to narrow it down.

For my daughter's bouquet, I wanted to go with all white to set her apart, no winter greens, and a really special, delicate flower. I thought about Lily of the Valley as a traditional sweet-smelling wedding flower, but later found out that each one of those little stems would cost about five dollars and we probably needed 50. So, plan B... I saw something online about freesia, a flower that I had in my wedding bouquet years ago. It was a bit pricey, but well worth it for the beauty. I figured that we weren't paying a lot for the rest of the flowers, so we could splurge for the bride.


I decided to use the mums for the bridesmaids and the table centerpieces, and the freesia for the bride. I also added in some white roses in the design for the bridal bouquet. 

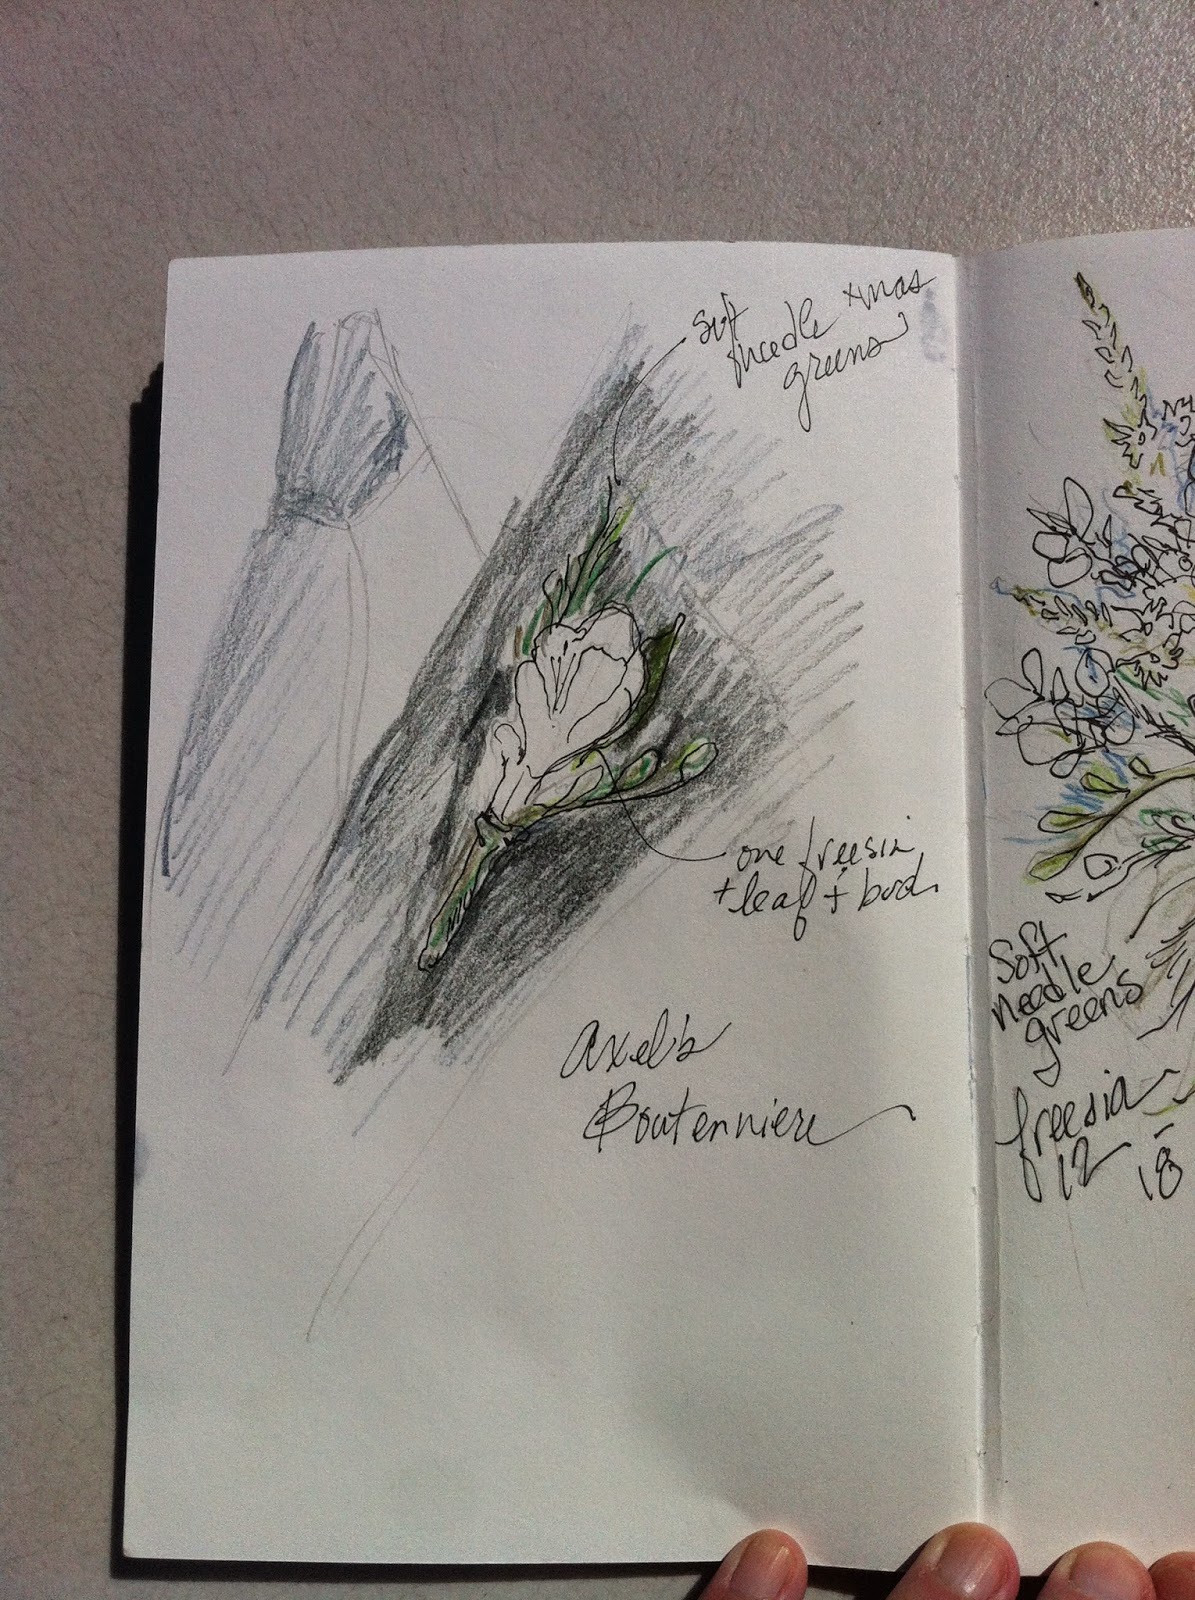
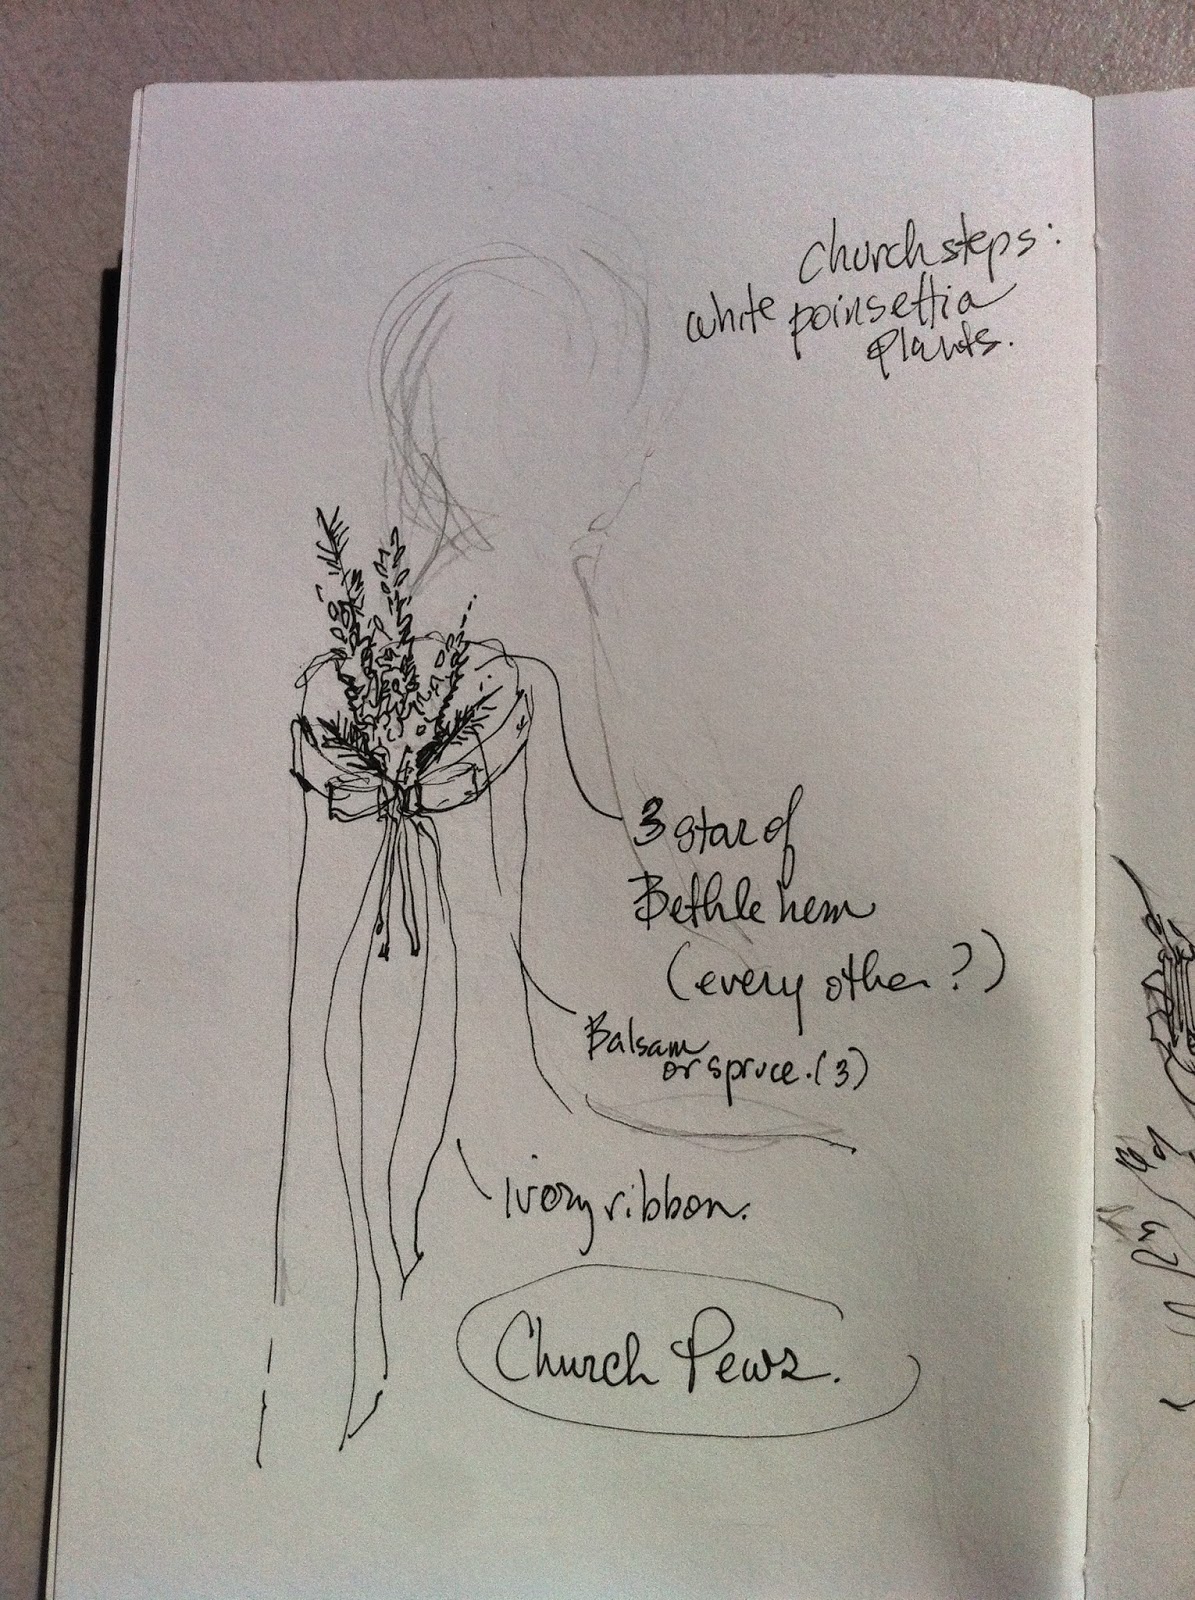
The other really special flower I found was called "Star of Bethlehem", which comes out for winter. I really loved the symbolic significance as well as the design, and decided to use them for the bride, bridesmaids, church pews, and groomsmen's boutonnieres. The groom would have a freesia.

The last little addition to the design during the drawing stage were the pussy willows. I love this winter reed, and my daughter went nuts when they actually appeared to us. We are both bunny lovers, and she said the soft buds felt like bunny tails. I decided in designing that they would add a lovely whimsy to the arrangements, and I was really right.


After the drawings were done, I discussed everything with the florist who would help me order the flowers.

Luckily, we had been referred to Tucker Flower Shop in Tucker, Georgia. The consultant who was ordering the flowers for me was unbelievable, both with his knowledge, design sense, and his ability to relate to my vision. He and I hit it off just about from the start. And it didn't hurt that he was crazy about all things Japanese. He did a lot of research on all of the flowers, and we settled on white "football" mums- they gave us the most bang for the buck, and they were gorgeous.

We had to go through the "greens", because I decided that there were some leaves there that weren't your typical "Christmas" greens, that I wanted.  I really wanted to add some juniper, because of the gorgeous blue-colored berries. Something told me to do that, and as I did, I remembered that I used to use Juniper a lot for our Advent Wreath at home- my candles were always 3 deep blue and one purple. I don't even know if it was a coincidence that this came together during the Advent season, as it has been years since I set up that wreath. But it was really a pretty combination, especially in the woods.

Juniper- a whole case!

Lastly, we added a whitish green plant called "dusty miller", a purplish leaf called Agonis,  and a fluffy fern called"plumosa", all which the florist had identified from a photo of a bouquet that my daughter liked.

Agonis (above) and Dusty Miller

Tree fern (shiny, above left), and Plumosa (or "Asparagus fern")


We picked up the flowers the morning of the Thursday before the Saturday wedding, and all that day was focused on the centerpieces first and then the bouquets. I figured I'd wait til Friday for the boutonnieres since once they were done, I couldn't have them in water.

Loading up the car


Luckily I had the help of a couple of her bridesmaids for part of the time, and her future mother- and father- in law were so gracious in letting me use their basement for everything. They helped me place everything in buckets and trim the ends of all of the flowers and greens, including cutting up the greens themselves into workable pieces. This was saying a lot, especially for the juniper.

 Juniper and Pussy Willow

We placed the Freesia and Star of Bethlehem inside though, since those flowers needed to open a little before the wedding, so they would have to be in warm, or at least room-temp water. When all that was left were the bride's flowers in that bucket after making the arrangements, I placed them in a vase and waited until the last moment to put them together for the bouquet.


My daughter had bought mason jars with candles inside for the centerpieces, so I decided to go with some pie plates to place the jars, and surround them with floral foam to build the centerpieces. We soaked them all outside and brought them in one by one as we worked. All of the greens we separated first and laid in piles so they'd be easy to pull from. I also separated the greens in a separate area that would go into the bouquets from those that would go into the centerpieces to make sure we had enough. The pussy willows had to be cut in sections carefully so I'd have enough for all of the centerpieces, bouquets and boutonnieres (for those, I used the very tender tips). 


I started the arrangements with the mums, then added the juniper since it was a little tricky to work with, filled in with the rest of the greens and added the pussy willow last.  Once we were done with the centerpieces they went outside because the temp outside was close to the perfect 38 deg. temp for the flowers- later we placed them in the garage so they wouldn't freeze overnight.


 The bouquets came next, and thankfully there were only four bridesmaids because I was wiped out by then! They contained the same as the centeripieces- 2 mums each, cedar, pine, fir, juniper, agonis, pussy willow, and for these also I added the star of bethlehem.


Next I made the flowers that would go on the church pews- these had the Star of Bethlehem, Agonis, Cedar, Pine, Fir, and Juniper. I used the Dusty Miller mostly for these, because their stems ended up being too short for the bouquet designs and they were too delicate for rooting too much into the centerpieces.


Thursday night, I still had to finish up my daughter's hem (which I described in the previous post), so the flowers sort of came to a halt. The next morning I was up at it again making the boutonnieres, and I snuck in time after the rehearsal dinner that night to finish tying bows on all of the bouquets. And at the last minute, the bride's freesia was opening up beautifully, and late Friday night I put my daughter's beautiful bouquet together for her.
WHEW!!
Bride's bouquet- Freesia, Star of Bethlehem, White Roses ("Eskimo"variety)


 Groomsmen boutonnieres (above) with Star of Bethlehem, juniper, pussy willow and plumosa fern.
Groom's boutonniere (below) with freesia and plumosa fern


Groomsmen boutonnieres

 Planning the site...

I laid out the reception plan in terms of the tables we would need to seat the guests- I had done a preliminary plan, but once I was up there for the wedding and we had a final count, it was time to put pen to paper again.  It was fun to figure out where people would be and to envision making s'mores at a bonfire, tended to by an eagle scout who had made the fire pit for the site. We took a trip out to Autrey Mill the first day that I arrived so that I could get final measurements. I was having so much fun I broke their tape measure in the process! OOPS!


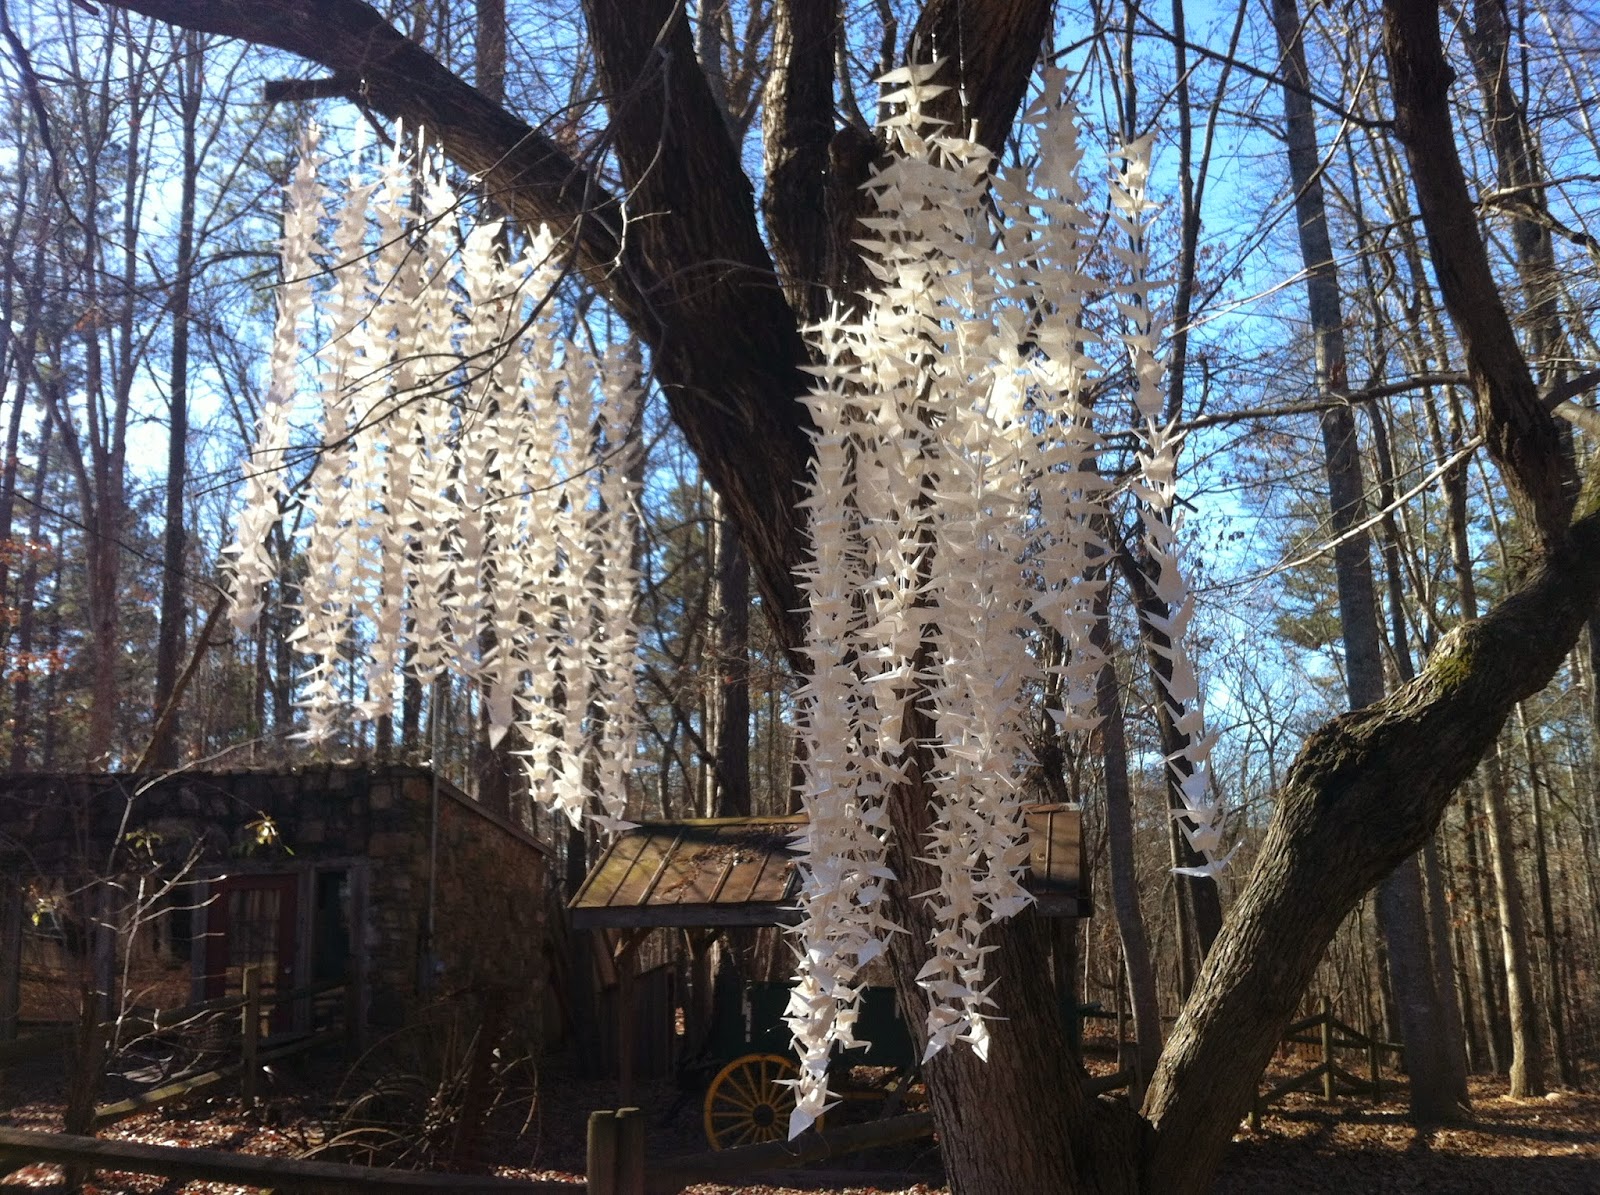
One of the visions that I originally had for the wedding at the very start were for making the traditional wedding cranes.  In our family, many times for weddings we traditionally fold 1,001 paper cranes, which is an old Japanese tradition, to wish the bride and groom health and a long, happy life together. From the moment I first saw the site months before the wedding, I knew that a tree near the pavilion where the reception would be held would be the perfect place for those cranes. I could just see them hanging there in the breeze. I wasn't sure if it would really happen, but all I had to do was say the word, and my sister-in-law went to work on half of them, with the rest made by bridesmaids, friends, myself, and my daughter.


My daughter strung the cranes on fishing line, 40 strings in all, 25 cranes per string, with one having 26. In-between she placed a cut piece of plastic straw to separate them a bit. I had the idea of tying the strings end to end so that the strands could be just hung over the big branches and we didn't have to tie anything or actually attach them to the tree in any way. In the end, I wasn't sure if hanging those strings of cranes was feasible, but the guys got it done, and it looked absolutely spectacular. I planned to place the cake table and sweetheart table under them so that the bride and groom could be framed by them. It was so magical to see them flowing with the wind.


After all was done, I really didn't even believe all that had happened. But I am so incredibly grateful to have been such an integral part of my baby girl's wedding, and it's something we'll always share.


Thursday, December 18, 2014

Mother of the Bride Part 2: A Stitch in Time

I left you all at the airport, and oh boy, a lot has happened in a very short time since then!
My daughter got married!

I thought I'd bring you along on the wonderful road I traveled as we prepared for the wedding, broken up into a couple of posts (because one post would be a LOT.)
With this first one, (well, part 2, I guess), I thought I'd tell you all about the knitting and sewing. My daughter made her own wedding gown, and I can't really speak for all of that except to tell you that she actually created it with no pattern- it was hand-draped, which meant hand-sewn for much of it. Her veil was bought, but the crown she wore was actually the same one I wore at my wedding, which was actually  my mom and dad's crowns tied together that they wore during their Greek wedding ceremony.

As my daughter was making her dress, I was in a quandary as to what in the world to wear myself. She would be married on a nature preserve that housed several historic buildings, including a chapel built in the 1800's (where the ceremony would be) and an outdoor pavilion (where the reception would be). Keep in mind that this wedding just happened on December 13, so I had planned on it being cool. It took me awhile to find a dress that I wanted. My daughter had no "color" to her wedding, if you will. What I mean is, she wanted only winter greens and white flowers for arrangements. Her bridesmaids were all picking out whatever dress they wanted to wear, no rules, no particular color, just some shade of green.

So, I figured I could go with a neutral sort of color. But I just couldn't find anything flattering that I liked. I looked quite a bit at patterns to make my own garment, and I almost went in that direction. My daughter loved the clothes on a website called www.Modcloth.com and suggested I check there before embarking on the sewing. I just so happened to fall in love with a dress that would be perfect for the cool weather- a soft, thick fabric, cowl-neck dress. And it had a handkerchief hem, above the knee, which I thought was fun. And it was actually called the "Showstopper Storyteller Dress". So, you know, I figured it was made for me and all. :)...The only thing is- it was a pretty bold indigo purple/blue. I showed it to my daughter online, and she told me she thought it was "rad". So it was a go. I ordered it thinking that I could just try it on and see how it looked and felt. When it came,  it slid on me so perfectly and felt like a warm, comfortable blanket, and I knew it was the one, bold color and all.

As I waited for it to arrive, I still kind of wanted to make something for myself, and I toyed with the idea of knitting a shawl- this was also my daughter's suggestion. However, there was only about a month's time before the wedding, and I didn't know if I could finish. "I have faith in you", said my daughter. So again, it was a go. I went to JoAnn Fabrics to look at yarn and patterns (with the last disaster blanket knitted with the cheapo yarn fresh in my memory), and ran across a pretty pattern that looked easy. Rather than casting on a small amount of stitches and making many rows, (like a scarf), it called to cast on 225 stitches on circular needles, (gauge 15 sts and 20 rows to 4" over st stitch using size 13 needle). They called for ribbon yarn, bulky weight, but I couldn't find ribbon yarn. However I figured I'd be okay if I just used a bulky weight yarn and got the right gauge.

A friend of mine suggested  I look at www.Yarn.com.  I found the most unbelievable yarn. I ordered "Mecha" by Malabrigo- the color I chose was "Piedras". It was 100% wool, made in Peru. I honestly can't say enough about the quality of this yarn. I have never used anything so soft, supple, forgiving, sturdy, and GORGEOUS in my life. It wasn't cheap, but I knew that it would turn out scrumptious. I figured that the colors range it had would bring my bold indigo together with the browns of the forest, and the greens of the floral arrangements. In fact, as it happened, one of the photo references that my daughter had for flowers included a purplish leaf that I ended up including in the arrangements, and the shawl ended up being a star.


I did learn at least one great new thing while making this piece. With the way I was taught to cast on, during the first row, I always would end up with a really long piece of yarn between the needles that would get tangled, and sometimes even had to be cut. Figuring there had to be a better way, I googled it, and there was! Here is a good video that I recommend if you haven't learned the long-tail cast-on method. It is easy, and makes a huge difference.
 https://www.youtube.com/watch?v=8wUPQDYtoy0

 
However, there was one curious thing- as I took the piece off of the needles once it reached a width of 18", I was a bit disappointed that it was not longer. I did check the gauge (well, more or less) and it looked like it would be more than long enough with the amount of stitches cast on. I wasn't sure what had gone wrong. All I could think was that I hadn't used ribbon yarn.

I did have an extra hank of yarn, and I toyed with the idea of adding on to each end. However, this last skein was a slightly deeper color, and it looked bad next to the existing knitting. I thought about sending it back and trying to fix it, but there was no time. In the end, I just added on a fringe and hoped it would be ok. For the fringe, I used some of the extra skein color and just a bit of extra yarn that I had that was closer to the color of the knitted piece, taking time to blend the colors of each piece of fringe (which included 3 pieces of cut yarn). In the end, the difference in color from the new skein was not noticeable at all in the fringe. As I packed to leave, I trimmed the fringe even and hoped for the best in terms of the overall length.


With the fringe and some time to stretch, the piece actually was a perfect length for me. I wore it for the rehearsal dinner with my brown sweater, and it was perfect. In the end, the shawl, together with some dark chocolate brown tights and ankle boots, and my indigo dress, really rocked for the wedding in the woods.

Also, my daughter had asked me if I could help her hem her bridal gown. "Sure!" I smiled, forgetting what it takes to hem a full-length gown with an almost full circle hem! It's funny, but you know, I knew it would all work out no matter how hard I had to work to get the ends tied, so to speak. I arrived in Atlanta late Tuesday night, which gave me all day Wednesday and Thursday, and part of the day Friday to get her gown and the flowers done. However, when you've got a lot of people to meet and family to see, time sure runs short! I ended up doing most of my real work between 9 pm and 2 am, and of course was up again by 6 with relatives. It was a long weekend!

Wednesday was pinning up the gown, which is really the only way to hem a dress of this caliber. In my experience, it can only be correctly done with the bride wearing her shoes and crinoline. We were confined to one small room in my daughter's apartment- the only room the kitty wasn't allowed in, so we wouldn't have any cat hair on the dress. Unfortunately that was the same room that housed the 1,001 paper cranes strung on fishing line and ready to hang at the reception! To make matters even more complicated, when my daughter had sewn her gown, she was just using every fraction of yardage available, without regard to any pattern. So in some areas there was up to a foot of extra fabric to be done away with at the hem, while in some areas, I barely had enough. The only thing that would have made it more complicated would have been if there was a train!

I tried to pin it up enough in front so she wouldn't trip- the site was really hilly and uneven. The back could go a little bit longer. But it was not an exact science by any means, which made me a little uneasy.

However, time was limited, and as she knew by the way I raised her, when the going gets tough the tough get going.  So we quickly pinned, and later that afternoon I set aside any plans to get together and relax with family, and I got down to business. It was then Wednesday night, only 1 more day to play with (considering rehearsal), and I still had to do flowers.

I spent the evening at my brother-in-law's home, in a quiet room upstairs. There was no tv or music to distract me (or keep me company), and I set the crinoline down (it stood up by itself- which is why we affectionately called it"the ghost".) 

Since I had spent some time earlier drawing a floor plan for the reception, by the time I began hemming the gown, it was already almost 10 pm. I was so completely exhausted from the trip, and getting ready to go before that. I looked over my daughter's veil on a nearby rocking chair, and it came to mind that nothing ever really does change. My little girl will always be my little girl. I reminisced about the early days after I brought her home from the hospital, living on such little sleep, but with so much love, just knowing that I would rock her until she fell asleep, no matter long it took.


However, I tried to push the thoughts out of my head- no time for crying or sappiness. In fact, I am quite sure that my daughter left the hemming and flower design tasks to her overly emotional mom to keep her from drowning in her own tears; she knows me so well!  As I was faced with the yards and yards of ivory satin, my old tried-and-true hemming methods came to mind- don't worry about the uneven excess fabric- just quickly and confidently hand-baste the hem where the pins told me to when she was wearing it, very close to the fold, and work my way all around the dress.


And there was A LOT of dress...

Then it was time to trim the excess fabric. However, I couldn't find any sewing shears in my daughter's sewing basket! No doubt they were in that room with the cranes somewhere back at her apartment. But I did find a pair of kid's scissors, and- "what's this?! a palette knife!" ("That's my girl", I thought... "The apple doesn't fall far from the tree"). :)


Luckily, I found a pair of scissors in my sister-in-law's kitchen that would do. I was afraid to commit on such a precious piece of work and cut all of the extra fabric. I even called my daughter to get her vote of confidence. Time was of the essence, so I had to trust my gut. I went ahead and cut, folded over twice and pressed to get it ready for the final hand-hemming. After that I tiptoed downstairs - my back was aching from hunching over the ironing board, and I just wanted to sit and sew while watching some tv. (and get some hot chocolate). Before long, it was well past 1 am, and after watching a little Letterman I knew I had to get to sleep- it was going to be up early to go pick up the car-ful of flowers at 7 am. I only had gotten about one or two linear feet of hemming done, and there was at least a dozen more to go!

The next day was full of flower arranging, and I will get to that in the next post. That night, (Thursday), on very little sleep, it was time to hem again. This time, I was down to the wire, and really needed to get it done before I slept. I and the dress had been transferred to my daughter's wonderful in-laws' home, and I had the whole basement and giant tv to keep me company. Before she went to bed, my daughter's mother-in-law-to-be put on "Bridget Jones: The Edge of Reason", and I was almost done when the movie was done. Of course by then, it was almost 2 am! And up again before dawn on Friday with the new relatives! A whirlwind, and the wedding hadn't even begun.

I really didn't know how the hem would be- I prayed. I mean really prayed. But wow, it felt like a miracle that the hem turned out perfectly, and worked great for the hills on the site. She still had to lift up the front to trudge through the woods for the professional photos, but she just floated along the entire hilly venue during the ceremony and reception, just like an angel.


And, it was worth every moment of worrying that I wouldn't make it on so little sleep. The joy of seeing that smile gave me years and years more energy, just like when she was a little girl.

I'll be posting again soon about the wedding, focusing on the flower design process.